
How to use Stance Caddy
Thank you for choosing Stance Caddy to help improve the constancy of your stance and ball striking. When shipped to you Stance Caddy will be in its collapsed state, which fits easily into your golf bag. Stance Caddy works for both left and right handed golfers, simply flip it over when expanded to hit.

When Stance Caddy is setup correctly your shoulders will be centered directly over the center of your heels when addressing a 5 iron. The outside of your heels will be in line with your shoulders when addressing a wedge, and the inside of your heels will be in line with your shoulders when addressing your driver.
If you have questions about the stance, we recommend you read “The science behind Stance Caddy“. It will clarify some of the physics and geometry of the swing related to your foot and ball placement. You could also pick up a copy of the book “Hogan, Ben. Five Lessons: The Modern Fundamentals of Golf. Simon & Shuster, Inc., 1957” from which this is inspired.
Video Instructions
Detailed Written Instructions
Step 1 – Customize
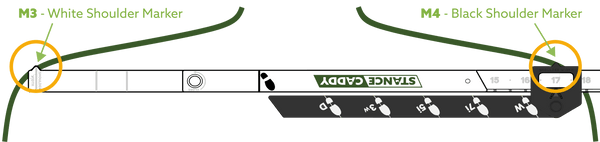
- Expand Stance Caddy so that the white (M3) and black (M4) shoulder width markers are pointing up.
- Place the white marker (M3) on top of your shoulder joint (simply raise your arm to the side to feel where the joint is).
- Slide the black marker (M4) out to measure the same spot on your opposite shoulder.
- Make note of the number in the window below the black shoulder marker (M4), that is where you will set the Stance Caddy every time you use it for every club in your bag.
- This setting is a great starting point and will work for most people. If your height varies to an extreme you may adjust the width setting +/- an inch to what feels comfortable using your 5 iron stance as the calibrating width.
Step 2 – Address the Ball

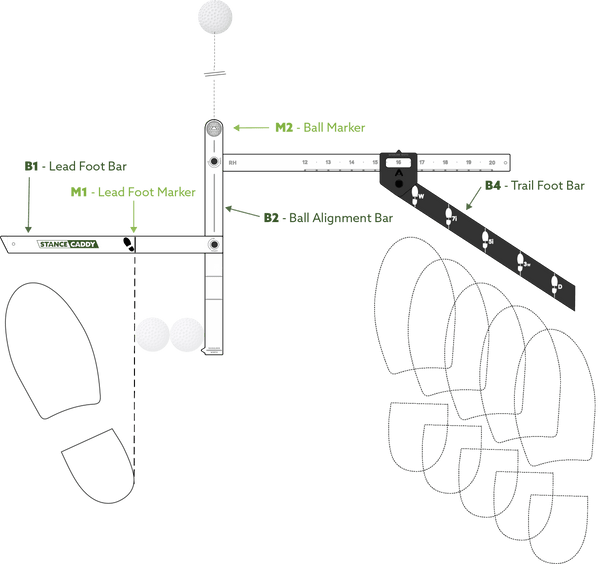
To ingrain your stance foot position, start with your feet together with the ball alignment bar (B2) between your feet. When setting your feet, you will build in the muscle memory to address the ball consistently.
Lead Foot
- Place your lead heel in line with the lead foot marker (M1). This is about two ball widths wide from your ball placement.
- Flare your foot out to align with the angle of the foot marker (M1). Note that the logo and lead edge of the front bar (B1) are also the same angle to help guide you.
- Position the front of your lead foot about an inch below the front bar (B1).
Trailing Foot
- Starting with the wedge, center your trailing foot about one inch below the "W" mark on the trail foot bar (B4). The same distance your lead foot is from the front bar (B1).
- As you work your way through your clubs continue to follow the club guides on the trail foot bar (B4).
- When you start you may choose to use only 5 points on the trail foot bar (B5) or practice along a continuum as your club lengths increase.
Ball Position
- The ball will always be in the same position off your lead heel. Simply envision a line straight out from the top of the ball marker (M2).
- Place the ball out from that ball marker (M2) so that your feet are about an inch from the Stance Caddy and your ball is on your target line.
Step 3 – Align
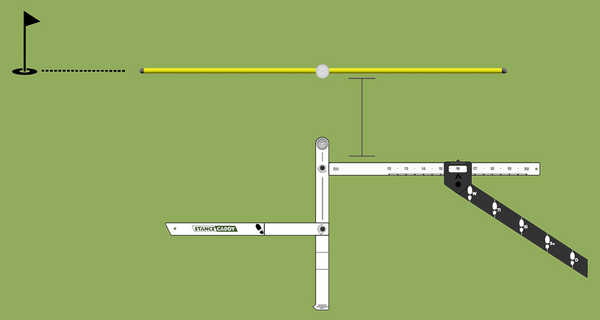
- When you practice hitting, extend Stance Caddy to its full swing configuration and set it at the number you previously measured.
- Use a club or alignment stick to aim down your target line.
- Place Stance Caddy so the numbered measurement bar is parallel to the club/alignment stick and far enough away so your feet will be 1 inch from it when you address the ball.
- You are now in perfect alignment with the target!